

To build kitchen cabinets using free plans, follow these steps :\n1. Measure the space accurately and create a detailed layout design for the cabinets .\n2.
Use high-quality materials like plywood or medium-density fiberboard (MDF) for construction. \n3. Cut the boards according to the measurements and assemble them using screws or glue. \n4. Install shelves, drawers, and doors as per the design. \n5. Sand the cabinets for a smooth finish and apply a suitable paint or stain.
\n6. Finally, attach the cabinets securely to the walls. By following these steps and using free plans available online, you can build your kitchen cabinets like a pro without spending a fortune.
Planning And Preparation
Building kitchen cabinets requires careful planning and thorough preparation to ensure a successful project. Before you begin, there are several key steps you need to take to set yourself up for success. Here’s what you need to consider:
Gathering Necessary Tools And Materials:
- Before you start building your kitchen cabinets, you’ll need to gather all the necessary tools and materials. These may include:
- Measuring tape
- Circular saw or table saw
- Drill and driver bits
- Screwdriver
- Clamps
- Sandpaper or sanding block
- Wood glue
- Screws or nails
- Cabinet hardware (knobs, hinges, etc.)
- Wood for the cabinets, such as plywood or solid wood
- Finishing materials, such as paint or stain
Choosing The Right Type Of Wood For Your Kitchen Cabinets:
- The type of wood you choose for your kitchen cabinets is an important decision. Consider the following factors when selecting your wood:
- Durability: Look for wood that is strong and resistant to wear and tear, as kitchen cabinets are subject to daily use.
- Appearance: Decide on the look you want for your cabinets – whether you prefer a natural wood grain or a painted finish.
- Cost: Different types of wood have varying costs, so consider your budget when making your selection.
- Sustainability: If environmental impact is important to you, choose wood that is sustainably sourced or consider alternatives like bamboo or reclaimed wood.
Measuring Your Kitchen Space Accurately:
- Accurate measurements are crucial to ensure that your kitchen cabinets fit perfectly in your space. Follow these steps to ensure precision:
- Use a measuring tape to measure the height, width, and depth of the available space for your cabinets.
- Take into account any obstacles such as plumbing or electrical outlets that may affect the cabinet dimensions.
- Double-check your measurements to avoid costly mistakes.
Creating A Detailed Plan For Your Cabinet Layout:
- Before you start building your kitchen cabinets, it’s essential to create a detailed plan for the cabinet layout. Consider the following aspects:
- Cabinet placement: Determine where each cabinet will be located in your kitchen.
- Cabinet dimensions: Based on your measurements, decide on the dimensions and design of each cabinet.
- Functional considerations: Plan for enough storage space and consider the placement of appliances and other kitchen elements.
- Aesthetics: Think about the overall style and design you want to achieve with your kitchen cabinets.
By taking the time to gather the necessary tools and materials, choose the right type of wood, measure your kitchen space accurately, and create a detailed plan, you’ll be well-prepared to build your own kitchen cabinets. These initial steps will help ensure a smooth construction process and a beautiful end result.
So let’s get started on creating your dream kitchen!
Designing Your Kitchen Cabinets
Designing your kitchen cabinets is an essential step in creating a functional and aesthetically pleasing kitchen space. With careful planning and consideration, you can ensure that your cabinets not only fit seamlessly into your kitchen but also fulfill all your storage needs.
Here are the key points to keep in mind when designing your kitchen cabinets:
Determining The Size And Dimensions Of Each Cabinet:
- Measure your kitchen space accurately to determine the size and dimensions of each cabinet.
- Consider the overall layout of your kitchen and how the cabinets will fit in with other elements like appliances and countertops.
- Plan for enough storage to accommodate your needs, whether it’s for dishes, pots and pans, or pantry items.
Selecting A Cabinet Style That Suits Your Kitchen Aesthetic:
- Explore different cabinet styles and designs to find one that complements the overall look and feel of your kitchen.
- Consider the architectural style of your home and the desired mood you want to create in your kitchen.
- Take into account both the door style and the finish of the cabinets to ensure they align with your aesthetic preferences.
Incorporating Functional Features Like Drawers And Shelves:
- Determine the functional requirements of your cabinets, such as the need for drawers or shelves.
- Opt for a mix of cabinets with doors and open shelves to cater to different storage needs.
- Consider incorporating specialized features like pull-out drawers, lazy susans, or spice racks for added convenience and organization.
Optimizing Storage Space With Specialized Cabinet Inserts:
- Maximize the storage capacity of your cabinets by incorporating specialized inserts like dividers, trays, or vertical storage racks.
- Utilize corner spaces effectively with corner cabinets or carousel systems that make accessing items easier.
- Explore options for vertical storage, such as tall pantry cabinets or slim pull-out organizers, to optimize space utilization.
Designing your kitchen cabinets is an exciting process that allows you to create a space tailored to your needs and style. By considering the size and dimensions, selecting a suitable style, incorporating functional features, and optimizing storage space, you can create cabinets that perfectly blend aesthetics and functionality.
So, let your creativity flow and design the kitchen cabinets of your dreams!
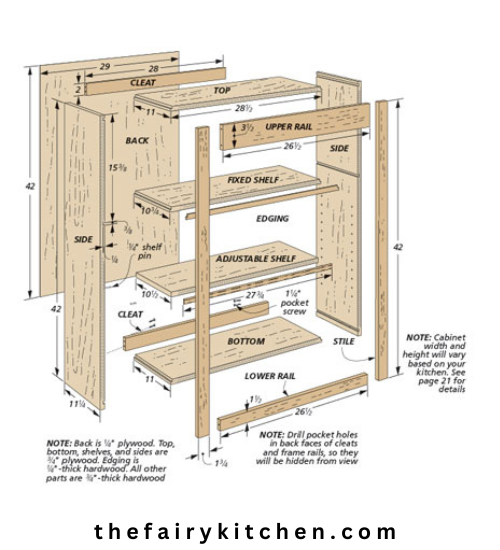
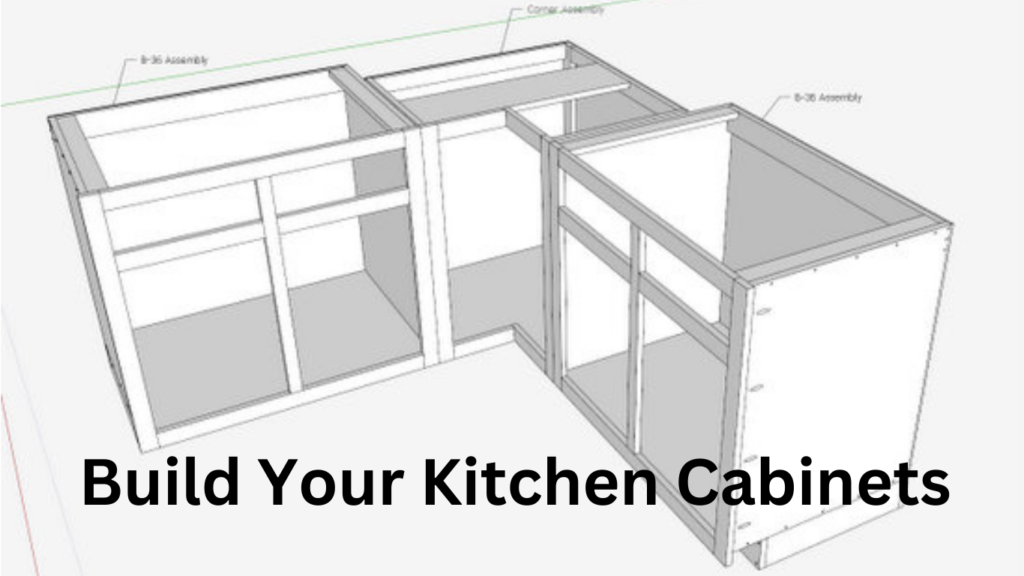
Building The Cabinet Frames
Step-By-Step Guide To Cutting And Assembling Cabinet Frame Pieces
Building kitchen cabinets from scratch can be an exciting and cost-effective project. When it comes to constructing the cabinet frames, precision and sturdy joinery techniques are crucial for ensuring a long-lasting and functional result. Whether you’re a seasoned diy enthusiast or a beginner looking to tackle your first cabinet project, this step-by-step guide will walk you through the process of cutting and assembling the cabinet frame pieces.
Here are the key points to consider:
- Measure twice, cut once: Before starting, ensure you have accurate measurements of the cabinet frame pieces. Taking precise measurements will save you time and minimize errors during the assembly process.
- Choose the right materials: Opt for high-quality plywood or mdf (medium-density fiberboard) for the cabinet frame pieces. These materials are durable and easy to work with, allowing for cleaner cuts and smoother assembly.
- Use proper joinery techniques: To ensure a sturdy construction, consider using techniques such as dado joints, pocket holes, or dowels. These methods create strong connections between the frame pieces, providing added stability and longevity to your cabinets.
- Assemble the frame pieces: Begin by cutting the side panels according to your measurements. Then, attach the top and bottom panels using the chosen joinery technique. Ensure tight and secure connections by using clamps or screws where necessary.
- Install the cabinet backings: Once the frame is assembled, attach the back panels to provide structural support and create a finished look. Make sure to align the back panels properly and secure them in place using nails, screws, or adhesive.
- Check for proper alignment: Before moving on to the next step, double-check the alignment of the cabinet frame pieces. Use a level to ensure everything is straight and square, making adjustments if necessary.
By following these step-by-step instructions, you’ll be well on your way to building sturdy and functional cabinet frames. Remember to take your time, pay attention to detail, and enjoy the process. You’ll be amazed at the satisfaction that comes from completing your very own kitchen cabinets.
Happy building!
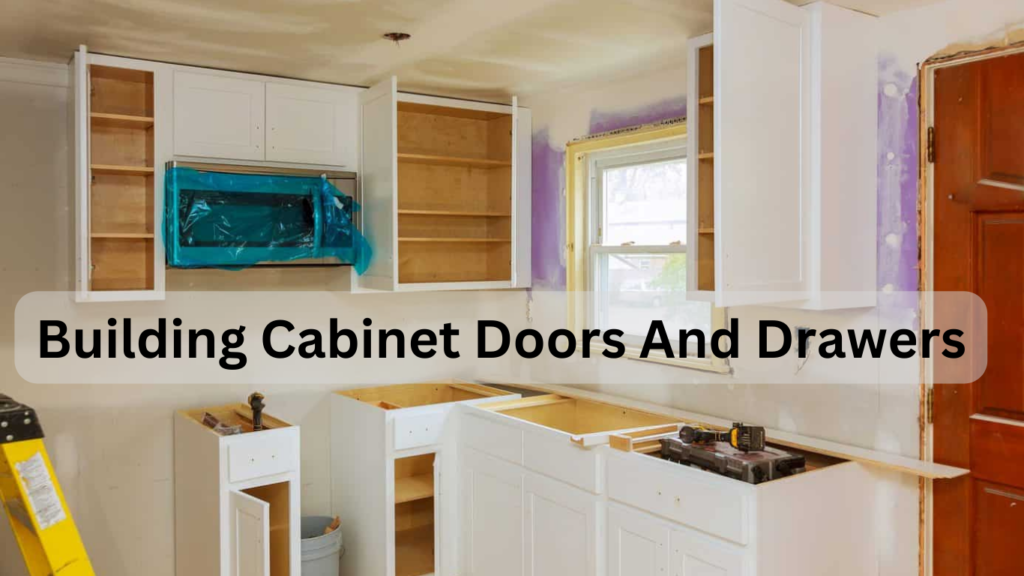
Building Cabinet Doors And Drawers
Selecting the right door and drawer styles for your cabinets:
- When it comes to building kitchen cabinets, selecting the appropriate door and drawer styles is essential to achieve the desired aesthetic. Here are a few key points to consider:
- Choose a style that complements the overall design of your kitchen. Whether you prefer a traditional, modern, or transitional look, the door and drawer styles should align with your vision.
- Consider the functionality of the doors and drawers. Opt for doors that swing open or slide, depending on your space and accessibility needs. Similarly, drawers should be easy to open and close smoothly.
- Explore various material options. Solid wood, mdf, plywood, or even glass can be used for the doors and drawers. Each material has its own advantages, so choose the one that fits your preferences and budget best.
- Take into account the hardware options. Knobs, handles, or pulls can add the finishing touch to your cabinets and enhance their overall appearance. Choose hardware that complements the style and material of your doors and drawers.
Techniques for building and installing cabinet doors:
- Building and installing cabinet doors requires attention to detail and precision. Here are a few key techniques to follow:
- Measure twice, cut once. Accurate measurements are crucial to ensure that the doors fit perfectly into the cabinet openings. Double-check the dimensions before cutting any materials.
- Choose the appropriate joinery method. Depending on the style and complexity of the doors, you can opt for techniques like mortise and tenon, pocket screws, or dowels. Research and practice the chosen method before proceeding.
- Assemble the doors with care. Apply wood glue to the joints and clamp them securely for a strong bond. Use finish nails or brads to reinforce the joints if necessary.
- Install the doors correctly. Use adjustable hinges to easily align and level the doors. Follow the manufacturer’s instructions for a seamless installation.
Building drawers with proper slides and hardware:
- Drawers are an essential component of kitchen cabinets. Here are the key points to keep in mind when building and installing drawers:
- Choose quality drawer slides. Soft-close, full-extension slides are highly recommended for smooth and silent operation. Measure the drawer box and cabinet opening carefully to select the appropriate size and type of slides.
- Use sturdy materials for the drawer box. Plywood or solid hardwood is preferable, as it provides durability and stability. Consider adding a solid wood front for an elegant touch.
- Assemble the drawer box with precision. Ensure the corners are square and reinforce them with glue and screws or nails. Use a level to ensure that the drawer box sits straight and flush within the cabinet.
- Attach the drawer slides accurately. Follow the manufacturer’s instructions to properly align and secure the slides to both the drawer box and cabinet. Test the smoothness of the drawer’s movement before proceeding.
Adding finishing touches like handles or knobs:
- The choice of handles or knobs can greatly impact the overall appearance of your kitchen cabinets. Consider the following:
- Select styles that coordinate with your door and drawer choices. Whether you prefer a sleek and minimalistic look or ornate designs, the handles or knobs should complement the cabinet’s aesthetics.
- Pay attention to finishes. Choose hardware with a finish that matches other fixtures in your kitchen, such as faucets, lighting, or appliances. Consistency in finishes creates a cohesive look.
- Ensure proper installation. Use a template for accurate placement of handles or knobs. Double-check the alignment before securing them firmly. Test each handle or knob to ensure they operate smoothly.
Building cabinet doors and drawers requires careful consideration of styles, techniques, materials, and hardware. With the right approach and attention to detail, you can create functional and visually appealing cabinets that enhance your kitchen’s overall design.
Installing Cabinet Hardware
Selecting The Right Hardware For Your Cabinets
When it comes to installing cabinet hardware, selecting the right pieces can make all the difference in the overall look and functionality of your kitchen cabinets. Here are some key points to consider when choosing cabinet hardware:
- Style: Determine the style you want to achieve in your kitchen. Whether it’s modern, traditional, or rustic, choose hardware that complements the overall aesthetic.
- Material: Cabinet hardware comes in a variety of materials, including stainless steel, brass, bronze, and glass. Consider the durability, maintenance requirements, and visual appeal of each material.
- Finish: The finish of hardware can greatly impact the overall look of your cabinets. Options like polished chrome, satin nickel, and oil-rubbed bronze provide different levels of shine and visual interest.
- Functionality: Think about the functionality of your cabinet hardware. Do you prefer handles or knobs? Will you be incorporating soft close hinges or drawer slides? Consider how these elements will enhance the ease of use and efficiency in your kitchen.
Drilling Holes For Hinges, Handles, And Drawer Slides
Properly drilling the holes for your cabinet hardware is crucial for achieving a professional and polished look. Here are the key points to keep in mind when drilling holes:
- Measurements: Take accurate measurements to ensure precise hole placement. Use a measuring tape, pencil, and carpenter’s square to mark the locations.
- Templates: Utilize templates or jigs specifically designed for cabinet hardware installation. These tools can guarantee consistent hole placement and save you time.
- Drill bits: Select the appropriate drill bit size for the hardware you are installing. Use a drill with adjustable speed control to prevent damage to the cabinet material.
- Sanding: Before drilling, sand the area lightly to remove any rough edges or splinters. This will create a clean surface for the hardware to adhere to.
Installing Hinges And Ensuring Correct Alignment Of Doors
Installing hinges is a critical step in the cabinet building process, as they determine the smooth opening and closing of doors. Consider the following points to install hinges correctly:
- Door overlay: Determine the desired door overlay, whether it’s full overlay, half overlay, or inset. This will dictate how the door aligns with the cabinet frame.
- Hinge types: Choose the appropriate hinge type for your cabinet doors. Concealed hinges are the most common and provide a clean and streamlined appearance.
- Alignment: Use a combination square or level to ensure the doors are perfectly aligned with the cabinet frame. Adjust the hinges as necessary to achieve a consistent gap around the doors.

Attaching Handles Or Knobs To Cabinet Doors And Drawers
Once the doors and drawers are installed, it’s time to attach the finishing touch – the handles or knobs. Follow these tips to properly attach cabinet hardware:
- Handle or knob placement: Decide on the placement of handles or knobs. Measure and mark the desired locations on the doors and drawers before drilling.
- Mounting hardware: Check if the hardware comes with screws or bolts for installation. Ensure the length of the screws is appropriate for the thickness of your cabinet doors and drawers.
- Even spacing: Maintain consistent spacing between handles or knobs for a cohesive and visually appealing look. Use a template or measure carefully to ensure accuracy.
- Tightening: Attach the hardware securely, but avoid over-tightening, as it may strip the screw holes or damage the cabinet material.
Remember, the installation of cabinet hardware is a crucial final step in building kitchen cabinets. Take your time, follow the instructions carefully, and pay attention to the details to achieve a stunning result that complements your overall kitchen design.
Installing Kitchen Cabinets
Installing kitchen cabinets is an exciting and rewarding task that can transform the look and functionality of your kitchen space. Whether you’re a seasoned diy enthusiast or a beginner, following free plans can help you navigate the process with ease.
In this section, we will explore the key steps involved in installing kitchen cabinets, ensuring a seamless and professional finish. So, let’s dive in!
Preparing Your Kitchen Space For Installation
- Measure and mark the layout of your cabinets on the walls to ensure accurate placement.
- Remove any existing cabinets, appliances, and fixtures from the area to create a clear workspace.
- Make sure the walls are clean and free of any debris or loose paint that could affect the installation.
- Identify any electrical or plumbing outlets that may need to be repositioned to accommodate the new cabinets.
Securing Cabinets To Walls And Ensuring Proper Alignment
- Begin by installing a ledger board along the back wall to provide temporary support for the base cabinets during installation.
- Use a level and shims to ensure the cabinets are level and plumb before securing them to the wall.
- Drill pilot holes through the back of the cabinets and into the wall studs.
- Secure the cabinets to the wall using screws that are long enough to penetrate the stud depth but not so long that they protrude through the cabinet.
Adjusting Doors And Drawers For A Perfect Fit
- Once the base cabinets are securely in place, ensure that all doors and drawers are aligned properly.
- Adjust hinges, slides, and glides to achieve a seamless and consistent appearance.
- Use a screwdriver or allen wrench to tighten or loosen screws for precise adjustments.
- Test the doors and drawers to ensure smooth operation and proper alignment.
Connecting Cabinets And Ensuring A Seamless Appearance
- Join upper cabinets by aligning them with the lower cabinets and securing them together using cabinet screws.
- Use clamps to hold the cabinets in place while attaching them together.
- Adjust the doors and drawers again after connecting the cabinets to ensure they maintain a seamless appearance.
- Use molding or trim pieces to cover any gaps between cabinets or fillers for a polished and cohesive look.
By following these steps, you can install kitchen cabinets that not only meet your design preferences but also provide functionality and durability. Take your time, measure carefully, and follow the free plans to achieve professional results. Happy cabinet installation!
Applying Finishes And Sealants
Building kitchen cabinets can be a rewarding diy project that not only saves you money but also adds a personal touch to your space. Once you have completed the construction phase, it’s time to move on to the exciting stage of applying finishes and sealants.
This step is crucial for protecting your cabinets from moisture damage and enhancing their overall appearance. In this section, we will explore the process of preparing cabinet surfaces for finishes or paints, followed by applying stain, paint, or varnish. Finally, we will discuss the importance of sealing cabinets for improved durability and moisture resistance.
So let’s dive in and discover how to transform your kitchen cabinets into stunning focal points.
Preparing Cabinet Surfaces For Finishes Or Paints
- Clean the surfaces thoroughly to remove any dust, grease, or debris.
- Sand the cabinets using fine-grit sandpaper to create a smooth and even base.
- Fill any gaps, holes, or imperfections with wood filler and sand it down until it blends seamlessly with the surrounding surface.
- Use painter’s tape to protect adjacent areas from accidental paint or stain application.
- Apply a primer to ensure better adhesion and a more uniform finish.
Applying Stain, Paint, Or Varnish To Cabinets
- Choose the desired finish for your cabinets – stain, paint, or varnish – based on your aesthetic preferences and the overall style of your kitchen.
- If staining, apply the stain evenly with a brush or cloth, following the wood grain. Wipe off any excess stain to achieve the desired color intensity.
- For painting, use a high-quality brush or roller to apply the paint in thin, even coats. Allow each coat to dry completely before applying the next.
- Varnishing requires careful application with a brush or sprayer, following the recommended drying and sanding intervals between coats.
Sealing Cabinets For Improved Durability And Moisture Resistance
- Once the desired finish is achieved, protect your cabinets by applying a sealant or topcoat. This step will safeguard the wood from daily wear and tear, as well as potential exposure to water and humidity.
- Choose a suitable sealant such as polyurethane, lacquer, or shellac, depending on your specific needs and preferences.
- Apply the sealant according to the manufacturer’s instructions, using a brush or spray in thin, even coats. Ensure proper ventilation during the application process.
- Allow the cabinets to dry completely between coats, and lightly sand the surface between each layer for optimal smoothness.
- Finally, enjoy your newly finished kitchen cabinets, knowing that they are not only visually appealing but also protected and ready to withstand the demands of daily use.
By following these steps, you can take your kitchen cabinets from raw wood to finished masterpieces, elevating the overall look and functionality of your kitchen. So roll up your sleeves, unleash your creativity, and get ready to enjoy the fruits of your labor!
Final Touches And Considerations
Building kitchen cabinets can be a rewarding and cost-effective way to transform your space. In this section, we will discuss the final touches and considerations that will enhance the overall look and functionality of your cabinets. From adding crown molding or trim to addressing common issues like cabinet leveling or door adjustments, we’ve got you covered.
Additionally, we’ll share tips on installing cabinet lighting for improved functionality and provide guidance on how to maintain and care for your newly built cabinets.
Adding Crown Molding Or Trim To Cabinets For A Polished Look
- Crown molding or trim adds a touch of elegance and sophistication to your kitchen cabinets. Consider the style and material that complements your overall kitchen design.
- Measure and cut the molding or trim to fit the top edge of your cabinets. Use a miter saw for precise angles and joints.
- Attach the molding or trim using adhesive or nails, ensuring a secure and seamless installation.
- Sand and paint the molding or trim to match the color of your cabinets for a cohesive look.
Installing Cabinet Lighting For Improved Functionality
- Cabinet lighting can enhance both visibility and ambiance in your kitchen. Whether you choose under-cabinet lights or interior cabinet lights, they can make a significant difference.
- Determine the type of lighting that suits your needs. Led lights are energy-efficient and provide excellent illumination.
- Install the lights strategically to eliminate shadows and create a well-lit workspace.
- Consider using motion sensor switches or dimmers for added convenience and control over the lighting.
Addressing Common Issues Like Cabinet Leveling Or Door Adjustments
- Proper cabinet leveling is crucial for both aesthetic appeal and functionality. Use a level to ensure that all cabinets are perfectly aligned.
- Adjust cabinet doors to eliminate any gaps or misalignments. You can do this by tightening or loosening the hinges or using shims for minor adjustments.
- If you encounter any difficulties with the leveling or door adjustments, consult a professional or refer to the manufacturer’s instructions for guidance.
Tips For Maintaining And Caring For Your Newly Built Cabinets
- Regularly clean your cabinets with a mild cleanser and a soft cloth to prevent buildup of dirt and grime.
- Avoid using abrasive materials or harsh chemicals that may damage the cabinet finish.
- Protect the cabinet surfaces from excessive moisture by using coasters or placemats.
- Inspect and tighten hardware periodically to ensure everything remains secure.
- Consider applying a fresh coat of paint or stain every few years to maintain the cabinet’s appearance.
By considering these final touches and addressing common issues, you can ensure that your kitchen cabinets not only look exceptional but also function optimally. With the right finishing touches and ongoing care, your diy cabinets will continue to impress for years to come.
Frequently Asked Questions Of How To Build Kitchen Cabinets Free Plans
Are Free Plans Available For Building Kitchen Cabinets?
Yes, there are many free plans available online for building kitchen cabinets that you can use as a reference.
What Materials Are Needed To Build Kitchen Cabinets?
To build kitchen cabinets, you will need materials such as plywood, screws, hinges, handles, and a variety of tools such as a saw and drill.
How Difficult Is It To Build Kitchen Cabinets?
Building kitchen cabinets can be a challenging task, especially for beginners. However, with the right plans and tools, it is achievable for most diy enthusiasts.
Can I Customize The Design Of My Kitchen Cabinets?
Yes, one of the benefits of building your own kitchen cabinets is that you can customize the design to fit your specific needs and style preferences.
Is It Cost-Effective To Build Kitchen Cabinets Myself?
Building kitchen cabinets yourself can be cost-effective compared to buying ready-made ones, especially if you already have the necessary tools and skills.
Conclusion
To sum it up, building kitchen cabinets with free plans can be a cost-effective way to add a personal touch to your kitchen while also maximizing your storage space. By following the step-by-step instructions provided, you can create custom cabinets that fit your unique needs and style preferences.
It’s important to gather the necessary materials, properly measure and cut the pieces, and assemble everything with precision. Don’t forget to take advantage of free online resources and tutorials that offer additional tips and tricks for a successful cabinet-building project.
Whether you’re an experienced woodworker or a beginner, these free plans can guide you through the process and help you achieve professional-looking results. So, roll up your sleeves, gather your tools, and get ready to embark on a rewarding journey of creating your dream kitchen cabinets from scratch.
Happy building!